In Part 3 of this tutorial we used seven million tweets to train a base model in Keras and deploy it in a browser environment using Tensorflow.js. In this chapter, we'll learn how we can use a technique called transfer learning to fine-tune our base model using tweets from individual Twitter accounts. We'll create a graphical application that allows us to train models using an individual user's tweets and use them to generate synthetic tweets in the style of that user.
Until now, we've been using Twitter data aggregated from hundreds of thousands of different Twitter accounts. This has worked well for the purpose of training a base model to synthesize general tweets, but now we'd like to imitate individual Twitter user accounts. To do so, we'll use the Twitter API. We'll create a Node.js server that we can use to download a user's public tweets given their Twitter handle.
# leave the tfjs-tweet-generation directory to create and enter tweet-server/
cd ..
mkdir tweet-server
cd tweet-server/
Next create a package.json file inside of tweet-server/ and populate it using the contents below.
{
  "name": "tweet-server",
  "version": "0.1.0",
  "description": "Download Twitter data using an HTTP REST API.",
  "main": "server.js",
  "scripts": {
    "start": "node server.js"
  },
  "author": "Brannon Dorsey + Nick Briz",
  "license": "GPL-3.0",
  "dependencies": {
    "cors": "^2.8.4",
    "express": "^4.16.3",
    "twit": "^2.2.11"
  }
}
Install the project dependencies using NPM.
npm install
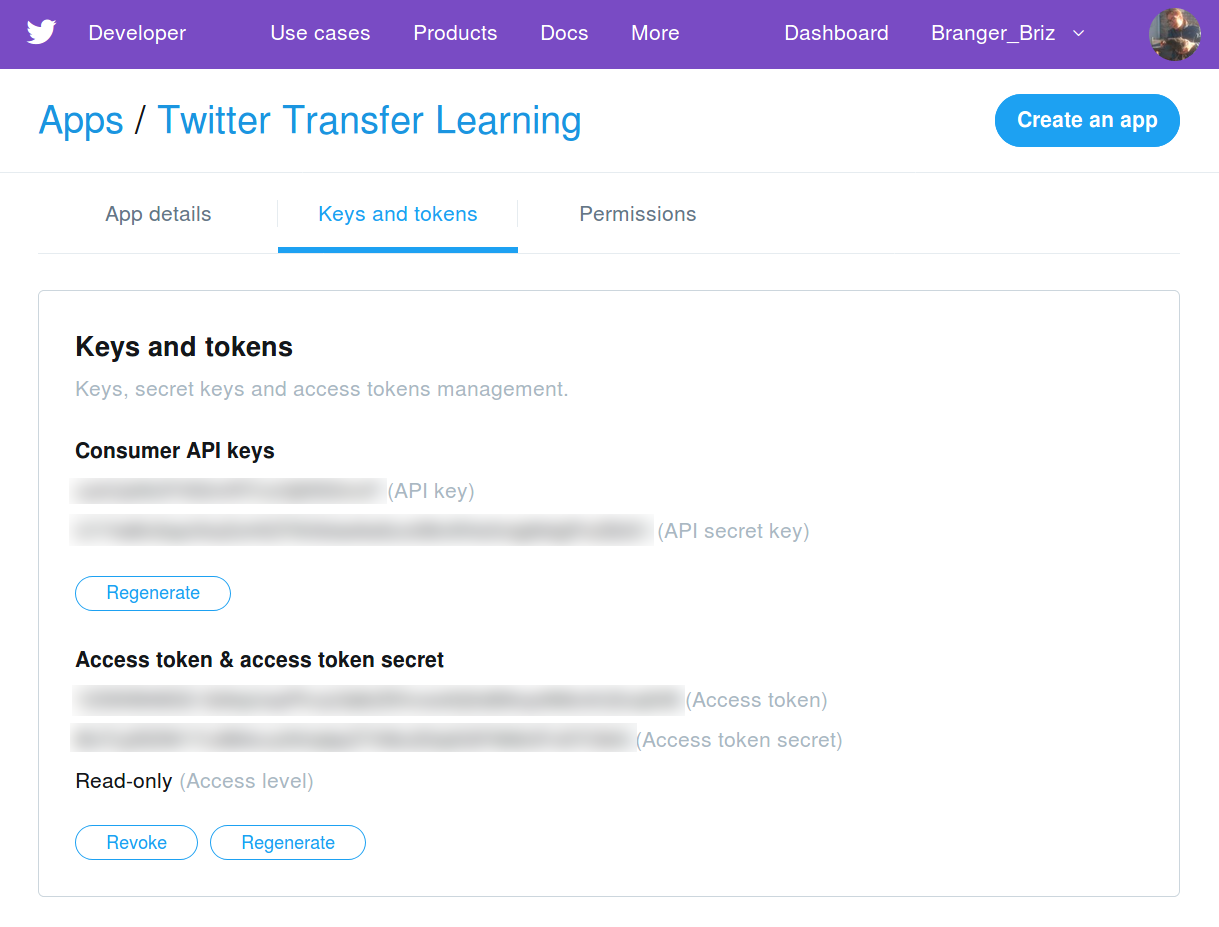
Before you can use the Twitter API, you have to create a Twitter API application using a developer account at developer.twitter.com. You'll need to submit an application to become a developer as well as to create a new application. Once that's done you'll need to generate consumer API keys and access tokens.
We'll use the Express framework to create our own REST API using Node.js. We'll download a user's tweets using GET requests by providing a Twitter username in the URL. A request like http://localhost:3000/api/barackobama will return a JSON object containing Obama's tweets.
Create a new file called server.js and fill it with the contents below. Replace the TWITTER_* constants with values from your Twitter API app.
const path = require('path')
const cors = require('cors')
const Twit = require('twit')
const express = require('express')
const app = express()
const http = require('http').Server(app)

// populate these constants using the API keys from your Twitter API app
const TWITTER_CONSUMER_KEY=""
const TWITTER_CONSUMER_SECRET=""
const TWITTER_ACCESS_TOKEN=""
const TWITTER_ACCESS_TOKEN_SECRET=""

// create an instance of Twit, which we'll use to access the Twitter API
const T = new Twit({
    // goto: https://apps.twitter.com/ for keys
    consumer_key: TWITTER_CONSUMER_KEY,
    consumer_secret: TWITTER_CONSUMER_SECRET,
    access_token: TWITTER_ACCESS_TOKEN,
    access_token_secret: TWITTER_ACCESS_TOKEN_SECRET,
    timeout: 60 * 1000 // optional HTTP request timeout for requests
})

// allows Cross-Origin Resource Sharing (CORS) on the /api endpoint
app.use('/api', cors())

// all GET requests to /api/ should include a user value in the path.
// This user value will be interpreted as Twitter handle.
app.get('/api/:user', async (req, res) => {
    const user = req.params.user
    try {
        const tweets = await getUserTweets(user)
        console.log(`[server] /api/:user got tweets for user ${user}`)
        res.json({ error: null, tweets: tweets })
    } catch (err) {
        console.log(`[server] /api/:user got tweets for user ${user} with error:`)
        console.error(err)

        let message = `Error fetching tweets for user ${user}`
        if (err.statusCode) {
            res.status(err.statusCode)
        } else {
            res.status(500)
        }

        if (err.message) message = err.message
        res.json({ error: message, tweets: null })
    }
})

http.listen(3000, () => {
    console.log('[server] Listening on http://0.0.0.0:3000')
})

// download ~3,200 of the user's most recent tweets.
async function getUserTweets(user) {
    // https://developer.twitter.com/en/docs/tweets/timelines/api-reference/get-statuses-user_timeline.html

    const tweets = []
    let batch = await getUserTweetBatch(user)

    tweets.push(...batch)
    console.log(`[twitter] Got ${batch.length} new tweets. Total ${tweets.length}`)
    // the twitter API we're using only allows tweets to be downloaded in groups
    // of 200 per request, so we create a loop to download tweets in batches
    while (batch.length > 1) {
        // use tweet ids for pagination
        let id = batch[batch.length - 1].id
        batch = await getUserTweetBatch(user, id)
        tweets.push(...batch)
        console.log(`[twitter] Got ${batch.length} new tweets. Total ${tweets.length}`)
    }
    // discard metadata and only return the contents of the tweets
    return tweets.map(tweet => tweet.text)
}

// download a batch of 200 tweets using maxId for pagination
function getUserTweetBatch(user, maxId) {
    return new Promise((resolve, reject) => {
        T.get('statuses/user_timeline', {
            screen_name: user,
            count: 200, // max (but can be called again with max_id)
            max_id: maxId,
            include_rts: true
        }, (err, data, res) => {
            if (err) reject(err)
            else resolve(data)
        })
    })
}
In this script, we register an HTTP route for all GET /api/:user requests, where :user is a Twitter handle. All requests that match this route will trigger a download of ~3,200 tweets using the twit npm package via the getUserTweets() function. This function downloads 200 tweets at a time in a loop using getUserTweetBatch(). Batches of tweets are combined into one array and stripped of metadata; the value returned from getUserTweets() is an array of tweet contents only. If the download succeeded a JSON object containing the tweets is returned as the result of the HTTP request: { error: null, tweets: [...] }). If there was an error downloading tweets, the tweets object is null: { "error": "Sorry, that page does not exist.", "tweets": null }.
node server.js
Let's query our new API in another terminal window.
# query the tweet-server using curl. This should take a few seconds and then
# print Obama's tweets as a JSON object like the one below.
curl http://localhost:3000/api/barackobama
{
    "error":null,
    "tweets": [
        "Today, I’m proud to endorse even more Democratic candidates who aren’t just running against something, but for some… https://t.co/oqewS0Y8vZ",
        "From civil servants to organizers, the young people I met in Amsterdam today are doing the hard work of change. And… https://t.co/mlAp2SRZlP",
        "The antidote to government by a powerful few is government by the organized, energized many. This National Voter Re… https://t.co/3W5pfaUdKd",
        "The first class of Obama Fellows is full of leaders like Keith—hardworking, innovative, and dedicated to partnering… https://t.co/nOd6FzH23n",
        "We will always remember everyone we lost on 9/11, thank the first responders who keep us safe, and honor all who de… https://t.co/ku270JQnwl",
        "RT @nowthisnews: If you still don't think the midterms will affect you, @BarackObama is back to spell out just how important they are https…",
        "Today I’m at the University of Illinois to deliver a simple message to young people all over the country: You need… https://t.co/brM6Vd7j2R",
        "Yesterday I met with high school students on Chicago’s Southwest side who spent the summer learning to code some pr… https://t.co/hY9B0mSQB9",
        "Congratulations to Hawaii for winning the Little League World Series! You make America very proud.",
        ...
    ]
}
Over in the terminal running our server.js process, we should see logs from the curl query. If something went wrong, it will likely appear here.
[server] Listening on http://0.0.0.0:3000
[twitter] Got 200 new tweets. Total 200
[twitter] Got 200 new tweets. Total 400
[twitter] Got 200 new tweets. Total 600
[twitter] Got 200 new tweets. Total 800
[twitter] Got 200 new tweets. Total 1000
[twitter] Got 200 new tweets. Total 1200
[twitter] Got 200 new tweets. Total 1400
[twitter] Got 200 new tweets. Total 1600
[twitter] Got 200 new tweets. Total 1800
[twitter] Got 200 new tweets. Total 2000
[twitter] Got 200 new tweets. Total 2200
[twitter] Got 200 new tweets. Total 2400
[twitter] Got 199 new tweets. Total 2599
[twitter] Got 199 new tweets. Total 2798
[twitter] Got 198 new tweets. Total 2996
[twitter] Got 200 new tweets. Total 3196
[twitter] Got 36 new tweets. Total 3232
[twitter] Got 1 new tweets. Total 3233
[server] /api/:user got tweets for user barackobama
We'll use this server to download tweets later in the tutorial, so leave it running. In the meantime, let's talk a bit about transfer learning.
Transfer learning is the process of using knowledge gained from one task to solve another task. In practice, this technique involves re-using model weights that were pre-trained using a large dataset as the initial weights of a new model trained using a smaller dataset. In non-transfer learning scenarios model weights are initialized using a random distribution. With transfer learning, a new model's weights are initialized using a checkpoint from a model that was trained using a different dataset, loss function, or performance metric.
The intuition behind transfer learning is that knowledge gained from one task can be transferred, through shared model weights, to a different but related task. In a character-level text generation task, our model must learn to extract language patterns entirely from scratch using the training data. Our untrained RNN model has no conception of the english language. Before it can learn to string related words together to form realistic looking sentences, it must learn to combine the right characters to create words at all. If the training data is too small, it's likely that our model won't even be able to generate english looking text, let alone anything that looks like a tweet.
Twitter's API restricts tweet downloads to a mere 3,200 tweets per user account, which isn't much data at all. If we were to train a model with randomly initialized weights using only tweets from a single user as training data, the model would perform very poorly. I would expect the model to either not be able to extract useful language patterns from such little text, or to instead memorize the training data and output only exact samples found in the training set. Instead of training our individual Twitter user models starting from randomly initialized weights, we will initialize them using the weights of the base model we trained using over seven million tweets in Part 3. Our base model has already learned to create english words and sentences, the appropriate lengths of tweets, and how to RT, @mention, and #hashtag. This prior knowledge extends our capability to train a model to imitate an individual Twitter user using very little training data.
Here's a pseudo-code example of how the model fine-tuning process works using transfer learning.
// train a new model for a very long time using a very large dataset
const baseModel = train(createModel(), 'large-dataset.txt')

// fine-tune the pre-trained model using a small dataset
const fineTunedModel = train(baseModel, 'small-dataset.txt')
We'll create one last folder inside of the twitterbot-tutorial/ directory we've been working from since Part 1.
# leave the tweet-server directory to create and enter twitter-transfer-learning/
cd ..
mkdir twitter-transfer-learning
cd twitter-transfer-learning/
twitter-transfer-learning/ will house our code for the rest of the tutorial. Here we'll create a small web application that:
tweet-serverLet's start off by creating a boilerplate directory structure and downloading a few dependencies that we'll use later on.
# src/ for source code files, lib/ for third party libraries, and checkpoints/
# to save our base model.
mkdir src lib checkpoints

# download our utility functions, which are nearly identical to the ones we
# created in Part 3.
wget -O src/utils.js https://raw.githubusercontent.com/brangerbriz/twitter-transfer-learning/master/src/utils.js

# download BBElements, a set of html/css/js components used for styling and
# branding @ Branger_Briz. This will make our app look pretty ;)
git clone https://github.com/brangerbriz/BBElements

# copy our base model to the new directory
cp -r ../tfjs-tweet-generation/checkpoints/base-model checkpoints/base-model
Create a package.json file with the contents below. If you have an NVIDIA graphics card with a CUDA environment installed, you should replace "@tensorflow/tfjs-node" with "@tensorflow/tfjs-node-gpu".
{
    "name": "twitter-transfer-learning",
    "version": "1.0.0",
    "scripts": {
        "start": "electron index.html"
    },
    "author": "Brannon Dorsey ",
    "dependencies": {
        "@tensorflow/tfjs-node": "^0.1.19",
        "electron": "^2.0.8",
        "hyperparameters": "^0.25.5",
        "json2csv": "^4.2.1",
        "node-fetch": "^2.2.0"
    }
}
Install these dependencies using NPM.
npm install
Let's create a new script called bin/fine-tune.js, which we'll use to explore the process of downloading twitter data and fine-tuning our base model using transfer learning. This self-contained Node.js script will demonstrate the fine-tuning process, void of UI code. We'll run this script from the command-line.
#!/usr/bin/env node
const tf = require('@tensorflow/tfjs')
const fs = require('fs')
const path = require('path')
const utils = require('../src/utils')

// exit if the twitter-user parameter isn't included
if (process.argv[2] == null) {
    console.error(`usage: ${path.basename(process.argv[1])} twitter-user`)
    process.exit(1)
}

//// If you have an NVIDIA GPU + CUDA installed, replace the below statement
//// this with:
// require('@tensorflow/tfjs-node-gpu')
require('@tensorflow/tfjs-node')
console.log(`using tfjs backend "${tf.getBackend()}"`)

// remove the leading @ character if it exists
const TWITTER_USER = process.argv[2].replace(/^@/, '')
const TWEET_SERVER = 'http://localhost:3000'

const BATCH_SIZE = 64
const SEQ_LEN = 64
const DROPOUT = 0.0
const OPTIMIZER = 'adam'
const FINETUNE_EPOCHS = 10
const VAL_SPLIT = 0.2

async function main() {

    console.log(`fetching tweets for user @${TWITTER_USER}`)
    let text, data
    try {
        [text, data] = await utils.loadTwitterData(TWITTER_USER, TWEET_SERVER)
    } catch(err) {
        console.error('Error downloading tweets.')
        if (err.message) console.error(err.message)
        process.exit(1)
    }
    console.log('download complete.')

    // these options will be reused between several of the utility functions
    const options = {
        batchSize: BATCH_SIZE,
        seqLen: SEQ_LEN,
        dropout: DROPOUT,
        oneHotLabels: true
    }

    const valSplitIndex = Math.floor(data.length * VAL_SPLIT)
    const valGenerator = utils.batchGenerator(data.slice(0, valSplitIndex),
                                              options)
    const trainGenerator = utils.batchGenerator(data.slice(valSplitIndex),
                                                options)

    const modelPath = 'file://' + path.resolve(__dirname,
                                               '..',
                                               'checkpoints',
                                               'base-model',
                                               'tfjs',
                                               'model.json')
    let model = await tf.loadModel(modelPath)
    // update the model architecture to use the BATCH_SIZE and SEQ_LEN
    // we've chosen for the fine-tune process.
    model = utils.updateModelArchitecture(model, options)
    model.trainable = true
    model.compile({ optimizer: OPTIMIZER, loss: 'categoricalCrossentropy' })

    // Fine-tune the model using transfer learning
    await utils.fineTuneModel(model,
                              FINETUNE_EPOCHS,
                              BATCH_SIZE,
                              trainGenerator,
                              valGenerator)

    // save the model in checkpoints/TWITTER_USER
    const saveDir = path.resolve(__dirname, '..', 'checkpoints', TWITTER_USER)
    if(!fs.existsSync(saveDir)) fs.mkdirSync(saveDir)
    await model.save(`file://${ path.join(saveDir, 'tfjs') }`)

    // we'll update the model architecture one more time, this time for
    // inference. We set both the BATCH_SIZE and SEQ_LEN to 1 and make
    // the model weights untrainable.
    let inferenceModel = utils.updateModelArchitecture(model)
    model.trainable = false

    // Generate 2048 characters using the fine-tuned model.
    const seed = "This is a seed sentence."
    const generated = await utils.generateText(inferenceModel, seed, 2048, 5)
    console.log(generated)
}

main().catch(console.error)
This script begins with a few dependency imports before checking if a command-line argument is defined with process.argv[2] == null. If it isn't, the program prints its usage and exits with an error code. If an argument was included it is interpreted as TWITTER_USER later in the program. If your computer has an NVIDIA graphics card and CUDA installed, you should use require("@tensorflow/tfjs-node-gpu") instead of the slower CPU only require("@tensorflow/tfjs-node-gpu").
We define several global constants in this script for Twitter download settings and hyperparameters. If the user specified the twitter-user command line argument with an "@" character (e.g. "@branger_briz") we remove it. We also define the URL for an instance of tweet-server we wrote earlier in this chapter via const TWEET_SERVER = 'http://localhost:3000', before defining the hyperparameter values we'll use to fine-tune our model. With this setup complete, we launch the main() function and log any errors to the console.
The main() function begins by downloading and encoding Twitter data via utils.loadTwitterData(TWITTER_USER, TWEET_SERVER). This function makes an HTTP request to our tweet-server's API and returns the JSON results or throws an error if something went wrong. Here's a peek at its source code inside src/utils.py:
/**
 * Load data using a tweet-server (https://github.com/brangerbriz/tweet-server)
 * @function loadTwitterData
 * @param  {string} user A twitter user to load tweets for
 * @param  {string} tweetServer A url pointing to a tweet-server instance
 * @returns {Promise}
 * @throws TypeError
 */
async function loadTwitterData(user, tweetServer) {
    const response = await fetch(`${tweetServer}/api/${user}`)
    if (response.ok) {
        const json = await response.json()
        if (json.tweets) {
            const text = json.tweets.join('\n')
            const encoded = encodeText(text)
            return [text, encoded]
        }
    }
    throw TypeError(`Failed to load tweets for ${user}`)
}
Once our data has been downloaded and encoded we create valGenerator and trainGenerator using utils.batchGenerator() just like we did in Python. This function is a JavaScript rewrite of our utils.io_batch_generator() Python function without the lazy loading functionality. We've removed this from our JavaScript implementation because we are fine-tuning our models using only ~3,200 tweets instead of 7,000,000+ and can fit all of this data into memory at once.
After loading our data generators we load our base model from disk and update its architecture to support our new values for BATCH_SIZE, SEQ_LEN, and DROPOUT with utils.updateModelArchitecture() We then further train our base model with await utils.fineTuneModel(). This function should look somewhat familiar to our Python train function with a few changes.
// utils.fineTuneModel(...)
async function fineTuneModel(model,
                             numEpochs,
                             batchSize,
                             trainGenerator,
                             valGenerator,
                             callbacks) {

    // keep a losses object to return at the end of fine-tuning
    const losses = {
        loss: [],
        valLoss: []
    }
    // reset the model's internal RNN states from wherever they were left
    // during the most recent model training
    model.resetStates()

    let lastEpoch = 0
    if (callbacks && typeof callbacks.onEpochBegin === 'function') {
        // if an onEpochBegin() callback was included, fire it now
        callbacks.onEpochBegin()
    }

    // Train epochs in an infinite loop
    while (true) {
        const [x, y, epoch] = trainGenerator.next().value
        const history = await model.fit(x, y, {
            batchSize: batchSize,
            epochs: 1,
            shuffle: false,
            yieldEvery: 'batch'
        })

        if (lastEpoch !== epoch) {
            const [x, y] = valGenerator.next().value
            console.log('evaluating model')
            const eval = await model.evaluate(x, y, { batchSize: batchSize })
            const valLoss = (await eval.data())[0]
            const loss = history.history.loss[0]
            let msg = `Epoch ${epoch} Train loss: ${loss} Val loss: ${valLoss}`
            console.log(msg)
            losses.loss.push(loss)
            losses.valLoss.push(valLoss)
            // Don't forget to reset states on each epoch!
            model.resetStates()
            lastEpoch = epoch

            // Free the tensor memory
            x.dispose()
            y.dispose()

            // Call the onEpochEnd() and onEpochBegin() callbacks if they
            // were included as arguments

            if (callbacks && typeof callbacks.onEpochEnd === 'function') {
                callbacks.onEpochEnd(lastEpoch, loss, valLoss)
            }

            if (epoch != numEpochs && callbacks &&
                typeof callbacks.onEpochBegin === 'function') {
                callbacks.onEpochBegin()
            }
        }

        // Once we've trained for numEpochs, release the tensor memory and
        // return the losses object
        if (epoch == numEpochs) {
            x.dispose()
            y.dispose()
            return losses
        }
    }
}
Once this function returns, we save our model using the Twitter user's account name in checkpoints/. Finally, we generate new tweets using our fine-tuned model by updating its architecture once again to accept BATCH_SIZE and SEQ_LEN values of 1 and calling utils.generateText().
Let's try it out! Make sure your tweet server from earlier in the chapter is still running. If it's not, open a new terminal in tweet-server and run node server. In a separate terminal window, run the src/fine-tune.js script.
node src/fine-tune.js barackobama
"In the middle class, in the carbon pollution share." President Obama on the Senate #AmericaLeads
It's ticket. That would be more than ever happened tonight after a beautiful private-section. #GetCovered #ImmigrationAction
"We cant take the power of the fight this year." President Obama #SOTU
"The first two years since the end of sears of three months, and subject on this." President Obama #ActOnClimate
"We have to make sure you can stand up to the planet." President Obama
The United States on Americans we can't stand a power of anniversary of the facts of the country talking about the #SOTU. https://t.co/nuniGBr0li
"With this deal with my family to health care reform: https://t.co/lAvZGRe7Ey http://t.co/0ynm9d80rg
RT @WhiteHouse: "A record-breaking this was about taxpayers will be here in Chicago tonight, the presidential is here: http://t.co/gzud9ssiV3 #GetCovered #DoYourJob https://t.co/jnz9hN0lVY
Today is a remarken to make change about the success of the minimum wage. http://t.co/k8sDgRE9Q7
RT @WhiteHouse: "We've got a stand against a fair hearing and an even about it." President Obama #SOTU
It's so easy to take a sector of middle-class families and want to go to start the planet for my features, but that made me want to see what we had all their consumers. #ACAWorks
"It's why we cant move our energy for constant of the capacity." President Obama #ItsOnUs
Its so fund." @OFA: President Obama says to #ActOnClimate about how to help close the private-sector job gain in America: http://t.co/ycydjKuYEm #ActOnClimate
That's it! I find it amazing how powerful transfer learning can be. We fit our base model to Obama's tweets in only ten epochs using very limited training data, and yet, the generated text actually sounds like the former president.
Now that we've got the basics of model fine-tuning down using bin/fine-tune.js, we're going to build an electron application that let's us create twitter bots using a graphical user interface. This will be the final project of this tutorial series.
We'll use Vue.js to create our user interface and simplify interaction with the DOM. We'll also use BBElements, an in-house HTML/CSS/JS library developed by @Branger_Briz. This set of web components keeps our web projects on-brand using only markup.
wget -O lib/vue.js https://raw.githubusercontent.com/brangerbriz/twitter-transfer-learning/master/lib/vue.js
Let's create an index.html file in the root of the twitter-transfer-learning/ folder. Here we'll define the HTML code for our single-page application. This code provides brief instructions to the user and a minimal interface for downloading tweets, training models, and generating new tweets. It relies heavily on Vue.js' {{ handlebars }} formatting and custom HTML attributes like v-bind, v-if, etc. We'll explain some of these features below.
<!DOCTYPE html>
<html lang="en">
<head>
  <meta charset="utf-8">
  <title>Twitter Bot Generator</title>
  <script src="lib/vue.js"></script>
  <!-- Include BBElements style and logic.
       More info at https://github.com/brangerbriz/BBElements -->
  <link rel="stylesheet" href="BBElements/css/bb-fonts.css">
  <link rel="stylesheet" href="BBElements/css/bb-styles.css">
  <link rel="stylesheet" href="BBElements/css/bb-responsive.css">
  <link rel="stylesheet" href="BBElements/css/bb-code-colors.css">
  <link rel="stylesheet" href="BBElements/css/bb-animations.css">
  <script src="BBElements/js/highlightJS/highlight.pack.js"></script>
  <script src="BBElements/js/BBElements.js"></script>
  <style>
    /* Add some styling in addition to the default BBElement styling */
    input, button, select {
        font-family: 'BB_copy', sans-serif;
        border: none;
        color: #5f5f5f;
        line-height: 24px;
        letter-spacing: 1px;
        margin: 0;
      }

      input, select {
        background-color: rgb(235, 252, 255);
      }

      button[disabled] {
        text-decoration-line: line-through
      }

      .black {
        color: black;
      }

    </style>
</head>
<body>
  <!-- #app acts as our application container.
       Vue.js targets this element and all of its children. -->
  <div id="app">

    <!-- Basic title and description -->
    <h2>Twitter Bot Generator</h2>
    <p>
      Create a bot that sounds like a twitter user. Download a user's twitter
      data, train an RNN model using transfer learning, and generate new
      tweets in their style, all from this electron app.
    </p>

    <!-- Data section: download twitter data for a user -->
    <section class="data">
      <h3>Data</h3>
      <p>
        Use the input field below to download twitter data for a specific
        user. Populate the field with a twitter username, excluding the @
        symbol, then press the "Download Tweets" button.
      </p>
      <em><p class="black">{{ twitter.status }}</p></em>
      <input type="text" name="twitter-user" v-model="twitter.user">
      <!-- run downloadTweets() on button press -->
      <button @click="downloadTweets()" :disabled="model.training">
        Download Tweets
      </button>
    </section>

    <!-- Model section: Load and train models and generate text. -->
    <section class="model">
      <h3>Model</h3>
      <p>
        Once you've downloaded twitter data you can train a new model using
        the "base-model." You can also load models you have already trained
        and continue to train them or use them to generate new tweets.
      </p>
      <em><p class="black" v-html="model.status"></p></em>

      <!-- A range slider to choose the number of training epochs -->
      <div>
        <label class="black">
          {{ numEpochs }} Epoch{{ numEpochs > 1 ? 's' : '' }}
        </label>
        <input v-model="numEpochs" style="width: 100%" type="range"
        min="1" max="10" value="2" step="1" >
        <span class="black">Faster</span>
        <span class="black" style="float: right">Better</span>
      </div>

      <label>Load Model</label>
      <!-- run loadModel() on selection -->
      <select v-model="model.path" v-on:change="loadModel(model.path)"
      :disabled="model.training">
        <option v-for="m in models" :value="m.path">{{ m.name }}</option>
      </select>
      <!-- run train() on button press -->
      <button
      :disabled="data.data == null || model.model == null || model.training"
      @click="train()">Train Model</button>
      <!-- run generate() on button press -->
      <button
      :disabled="model.model == null || model.training"
      @click="generate()">Generate Tweets</button>
    </section>

    <!-- Generated tweets section: Display output from a trained model. -->
    <section v-if="generatedTweets.length > 0" class="generated-text">
      <h3>Generated Tweets</h3>
      <p>
        Here are a few synthetic tweets generated in the style of
        @{{ model.name }}. Generating new tweets will replace these ones.
      </p>
      <p class="black" v-for="tweet in generatedTweets">{{ tweet }}</p>
    </section>
  </div>

  <!-- The electron.js script holds our all of our logic -->
  <script src="src/electron.js"></script>
</body>
</html>
This HTML page is split into three <sections> for downloading data, managing models, and displaying generated text. Content wrapped in curly braces (e.g. {{ }}) represent data held in JavaScript variables inside of src/electron.js. @click, :disabled, and v-* attributes also refer to JavaScript functions and data, which we'll define soon. v-if and v-for define conditional rendering logic and loops respectively. Vue.js automatically updates the DOM via a JavaScript data model: the UI automagically changes whenever data in the JavaScript model changes. JavaScript functions can also be called in response to user interaction events as is seen with the @click attributes, which call functions like downloadTweets(), loadModel(), train(), and generate(). This index.html file will act as a template to render content and for users to trigger the actions which we'll define next in src/electron.js.
const tf = require('@tensorflow/tfjs')
const utils = require('./src/utils')

//// If you have an NVIDIA GPU + CUDA installed, replace the below statement
//// this with:
// require('@tensorflow/tfjs-node-gpu')
require('@tensorflow/tfjs-node')
console.log(`using tfjs backend "${tf.getBackend()}"`)

// if you are on a machine with < 8GB of memory, reduce the batch size to 32
const BATCH_SIZE = 64
const SEQ_LEN = 64
const DROPOUT = 0.1
const VAL_SPLIT = 0.2
const GENERATED_TEXT_LENGTH = 2048
const TOP_N_SAMPLING = 5
const TWEET_SERVER = 'http://localhost:3000'

// create the Vue.js app, binding to the <div id="app"> element
const app = new Vue({
    el:'#app',
    // Vue automatically updates the HTML DOM when values in data are changed
    // all properties & objects referenced by Vue.js in index.html live here
    data: {
        numEpochs: 2,
        twitter: {
            // twitter user to download data from
            user: 'barackobama',
            // A status message rendered in the UI
            status: 'Click button to download a user\s tweets.'
        },
        data: {
            user: null, // the twitter handle whose data is loaded
            data: null // the user's tweets, encoded and ready for training
        },
        // the currently loaded model
        model: {
            name: null, // either 'base-model' or a twitter handle
            path: null, // the path to the saved model (e.g. indexeddb://jack)
            model: null, // the loaded model
            training: false, // is the model currently training?
            // status message for model training
            status: 'Select a model to use. Training "base-model" with twitter data will create a new model.'
        },
        // an array of trained model objects containing: { path, name }
        models: [
        // {
        //     path: 'indexeddb://some-twitter-handle'
        //     name: 'some-twitter-handle'
        // }
        ],
        // an array of tweets that were generated by a trained model.
        // the contents of this array are replaced when new tweets are generated
        generatedTweets: []
    },
    // called by Vue.js once the #app div has been "mounted" and is ready
    mounted: async function (){
        // list the models saved in indexeddb:// and save their names and paths
        // to the app.models array.
        const models = await tf.io.listModels()
        this.models = Object.keys(models).map(path => {
            return {
                path: path,
                name: path.split('//')[1]
            }
        })

        // if this is the first time the app is run, no models will be stored
        // in indexeddb://, so we load the base model from disk and save
        // it to 'indexeddb://base-model' for future reference.
        if (!this.models.map(m => m.name).includes('base-model')) {
            await this.loadModel('./checkpoints/base-model/tfjs/model.json')
            await this.model.model.save('indexeddb://base-model')
            this.models.push({
                name: 'base-model',
                path: 'indexeddb://base-model'
            })
            this.model.path = 'indexeddb://base-model'
        }
    },
    methods: {
        // download and encode a user's tweets and update the UI accordingly.
        // called by clicking the "Download Tweets" button in index.html
        async downloadTweets() {
            this.twitter.status = `Downloading twitter data for ${this.twitter.user}...`
            try {
                const [text, data] = await utils.loadTwitterData(this.twitter.user, TWEET_SERVER)
                this.data.data = data
                this.data.user = this.twitter.user
                this.twitter.status = `Downloaded twitter data for ${this.twitter.user}`
            } catch (err) {
                console.error(err)
                this.twitter.status = `Error downloading twitter data for ${this.twitter.user}`
            }
        },
        // load a model from disk or indexeddb:// and populate data.model.
        // called by clicking the "Load Model" button in index.html
        async loadModel(path) {
            this.model.status = `Loading model from "${path}"...`
            try {
                this.model.model = await tf.loadModel(path)
                this.model.path = path
                this.model.name = path.split('//')[1]
                this.model.status = `Model loaded from "${path}"`
            } catch (err) {
                console.error(err)
                this.model.model = null
                this.model.path = null
                this.model.status = `Error loading model from "${path}"`
            }
        },
        // Fine-tune a model using twitter data
        // called by clicking the "Train Model" button in index.html
        async train() {
            // only train if both model and training data exist
            if (this.model.model && this.data.data) {

                const options = {
                    batchSize: BATCH_SIZE,
                    seqLen: SEQ_LEN,
                    dropout: DROPOUT,
                    oneHotLabels: true
                }

                // signify that the training process has begun. This
                // temporarily disables certain functionality elsewhere in the
                // application
                this.model.training = true
                this.model.status = 'Updating model architecture...'

                this.model.model = utils.updateModelArchitecture(this.model.model, options)
                this.model.model.trainable = true
                this.model.model.compile({
                    optimizer: 'adam',
                    loss: 'categoricalCrossentropy',
                    metrics: 'categoricalAccuracy'
                })

                this.model.status = 'Training model...'

                const valSplitIndex = Math.floor(this.data.data.length * VAL_SPLIT)
                const valGenerator = utils.batchGenerator(this.data.data.slice(0, valSplitIndex), options)
                const trainGenerator = utils.batchGenerator(this.data.data.slice(valSplitIndex), options)

                try {
                    const callbacks = {
                        // Render the training and validation loss to the UI
                        // after each epoch
                        onEpochEnd: (epoch, loss, valLoss) => {
                            this.model.status += `<br>Training epoch #${epoch} loss: ${loss.toFixed(2)}, val loss: ${valLoss.toFixed(2)}`
                        }
                    }

                    // train the model!
                    await utils.fineTuneModel(this.model.model,
                                              this.numEpochs,
                                              BATCH_SIZE,
                                              trainGenerator,
                                              valGenerator,
                                              callbacks)
                } catch (err) {
                    console.error(err)
                    this.model.status = 'Error training model'
                    if (err.message) this.model.status += `: ${err.message}`
                    this.model.training = false
                    return
                }

                // if the model we just trained doesn't share a name with the
                // twitter user, save it as a new model (e.g. base-model trained
                // using @barackobama twitter data will be saved as a new model
                // at indexeddb://barackobama instead of overwriting base-model.)
                if (this.model.name !== this.twitter.user) {
                    const newModel = {
                        name: this.twitter.user,
                        path: `indexeddb://${this.twitter.user}`,
                    }
                    // add the model to the list of available models
                    this.models.push(newModel)
                    // update the model's new name and path
                    this.model.path = newModel.path
                    this.model.name = newModel.name
                }

                // save the model so we can load it again later
                this.model.status += `<br>Saving trained model to ${this.model.path}`
                await this.model.model.save(this.model.path)
                this.model.status += `<br>Model saved. Done.`

                // training is now done
                this.model.training = false
            }
        },
        // Generate text using the model
        // called by clicking the "Generate Tweets" button in index.html
        async generate() {
            // only generate tweets if a model has been loaded
            if (this.model.model) {
                this.model.status = 'Updating model architecture...'
                let inferenceModel = utils.updateModelArchitecture(this.model.model)
                inferenceModel.trainable = false

                const seed = "This is a seed sentence."
                this.model.status = `Generating text using ${this.model.path}`
                const generated = await utils.generateText(inferenceModel,
                                                           seed,
                                                           GENERATED_TEXT_LENGTH,
                                                           TOP_N_SAMPLING)

                // separate tweets using the newline character
                const tweets = generated.split('\n')

                // remove the first and last tweets, as they usually are garbage
                if (tweets.length > 2) {
                    tweets.shift()
                    tweets.pop()
                }

                // assign the tweets to the generateTweets variable so that
                // Vue.js can render them to the UI
                this.generatedTweets = tweets
                this.model.status = `Finished generating text using ${this.model.path}`
            }
        }
    }
})
After dependency imports and hyperparameter constant definitions we instantiate a Vue.js object with const app = new Vue(). The config object passed as the single constructor argument contains several important properties that control how the UI interacts with our data and code.
el: '#app' declares that this Vue.js object is bound to the <div id="app"> element in index.htmldata is a JavaScript object whose properties can be referenced inside <div id="app">. Any changes to this JavaScript object will be automatically rendered to the DOM.methods defines functions that can reference the data object using the this keyword. In our application these functions are triggered by user interaction in index.html. They manipulate the data object which then automatically updates the UI to reflect these changes.mounted is a special function which gets called as soon <div id="app"> is ready to receive automated UI updates by Vue.js. We are using this as the entry point to our application's code.The functions inside methods should look familiar to those in bin/fine-tune.js with logic added to interface with the data model and the event driven nature of a GUI application. I'll leave it up to you to study these changes and poke around as you see fit. In the meantime, let's run our final application!
# make sure the tweet-server is still running on localhost:3000...

# runs `electron src/electron.js`
npm start
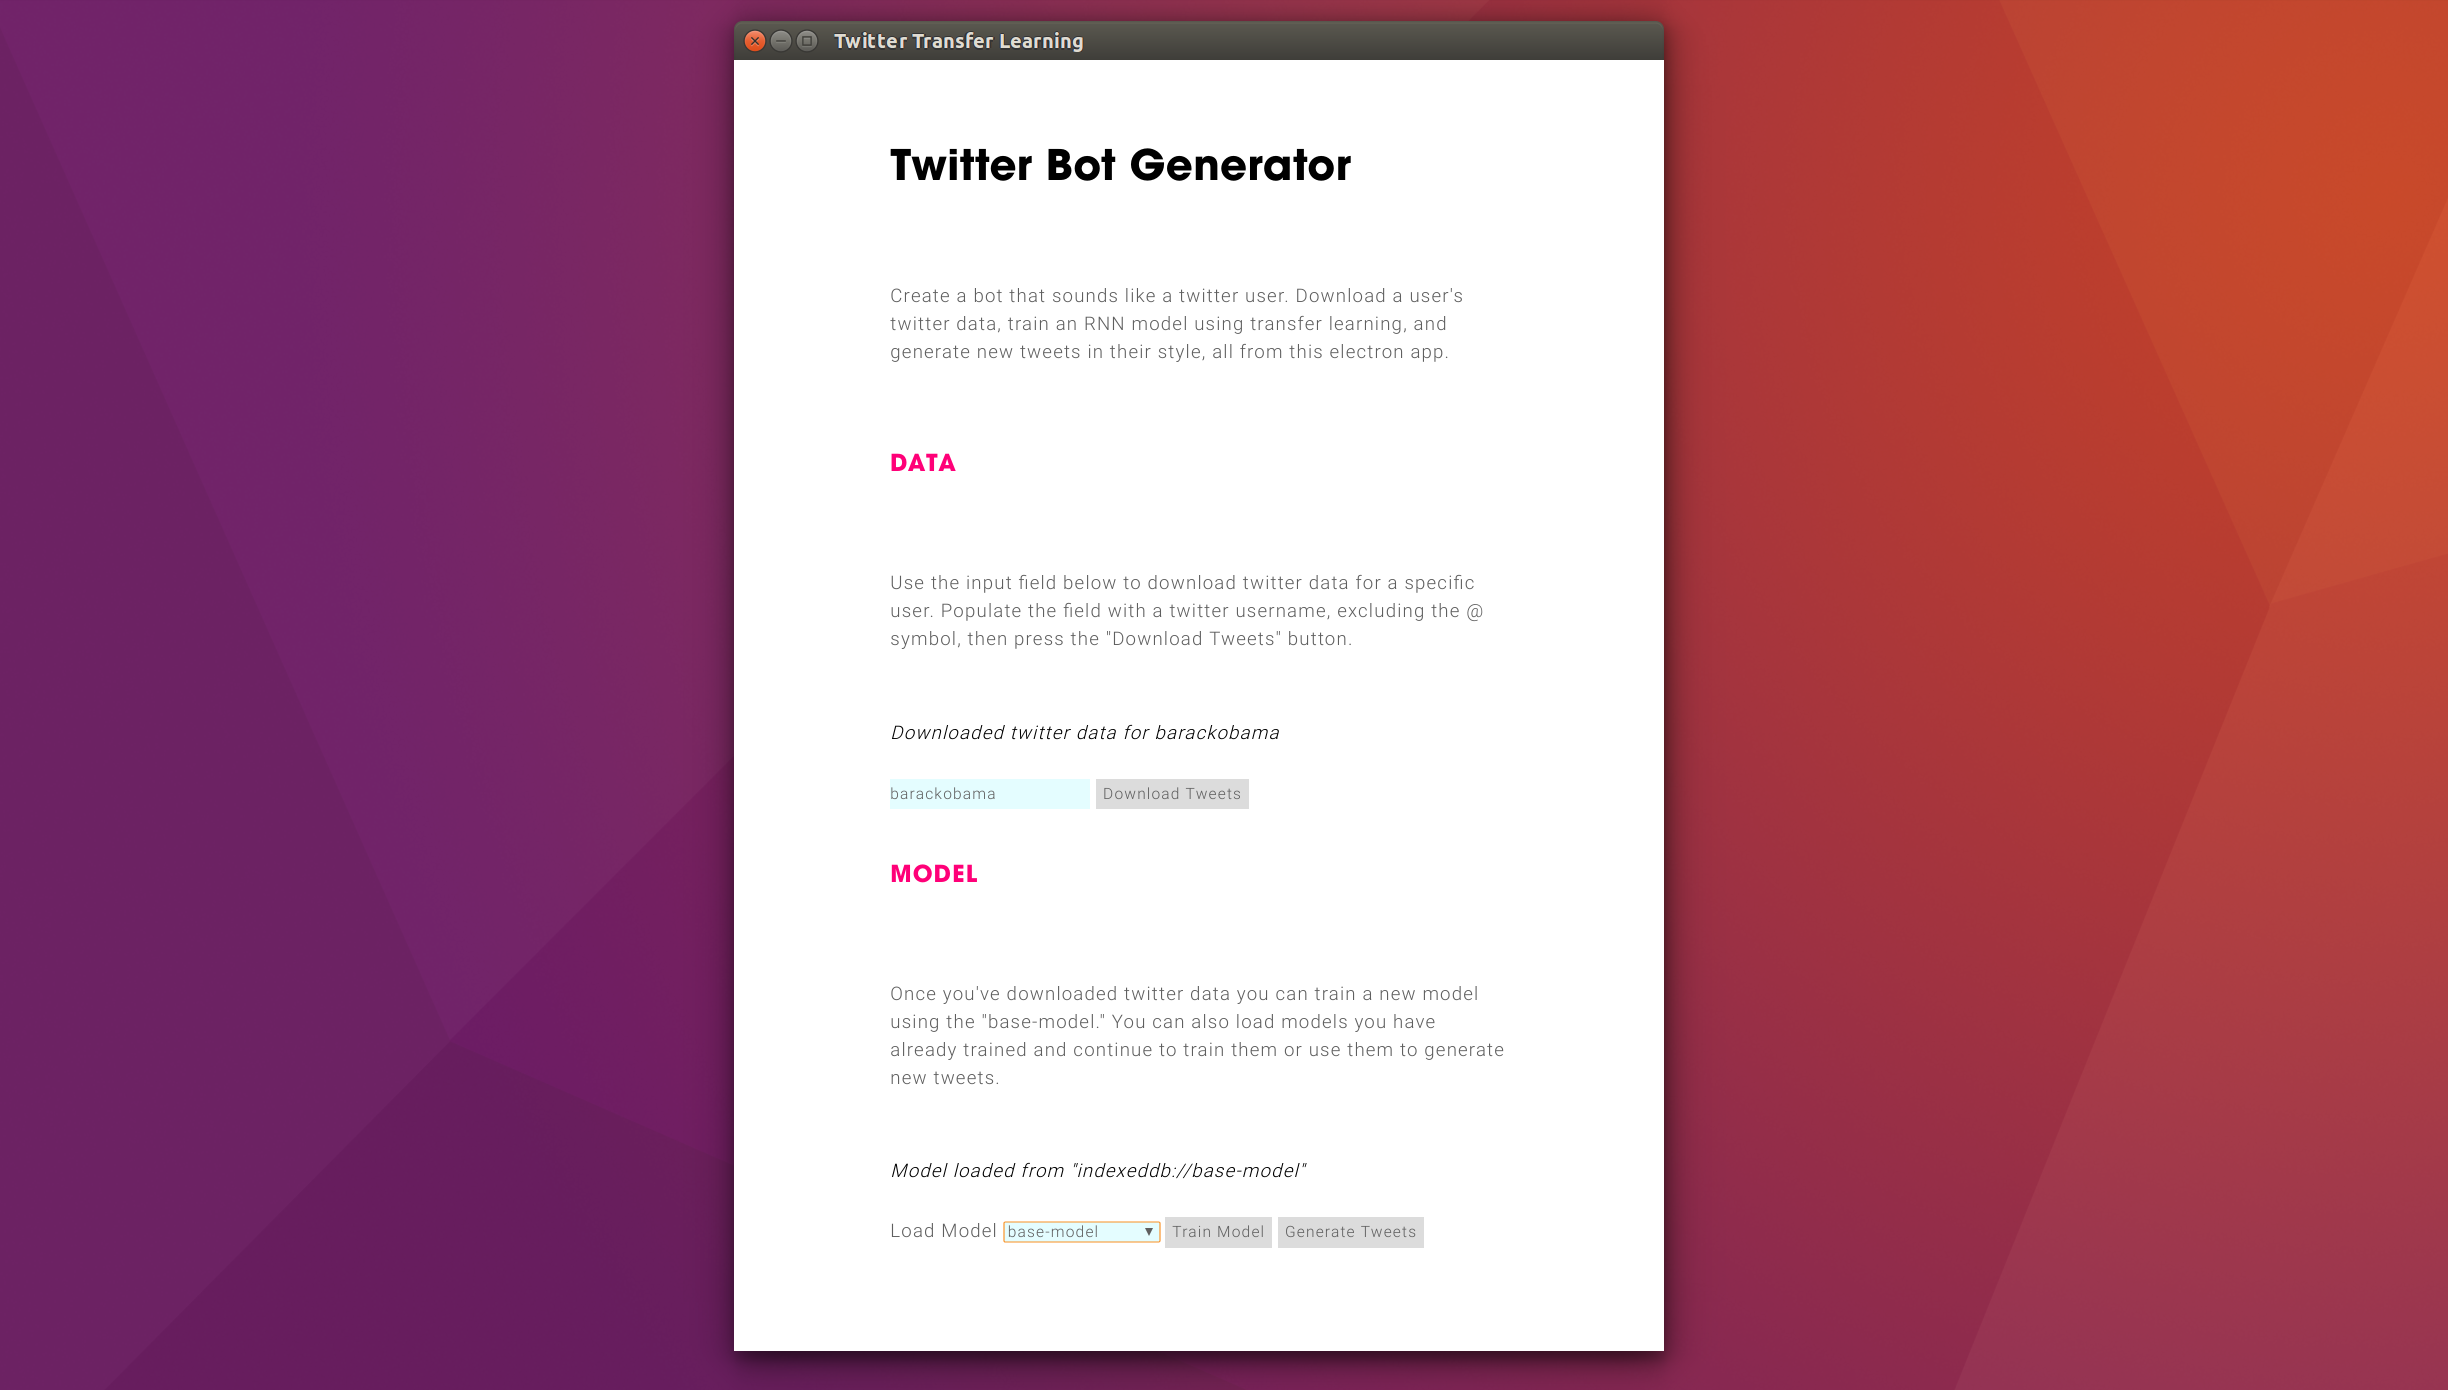
You should see an Electron window appear. The onscreen instructions describe how to use the app to download a user's tweets and use them as training data. Once you've downloaded data select the "base-model", use the slider to select a number of epochs to train for, and then press "Train Model". The window may periodically freeze during training and that's ok. After a while you should have a newly trained model saved to indexeddb://whatever-twitter-handle-you-chose. You can now use this model to generate tweets! Each time you press the "Generate Tweets" button ~2000 characters of text will be generated, replacing whatever tweets were last generated.
You can even experiment with training the same model using data from different Twitter accounts. Each time you train a model, you do so by fine-tuning an existing model. Normally you'll use the "base-model", but there is no reason you can't start with a model that's already been fine-tuned using data from another Twitter account. Play around and have fun!
Congratulations! You've made it to the end of this rather technical four-part tutorial series. Together, we've covered a ton of ground. We started by learning to prepare and encode a large, publicly available Twitter dataset, for downstream model training in Part 1. We then learned about model training and hyperparameter search in Part 2, where we trained a base model using Python Keras. In Part 3 we converted our Keras model to Tensorflow.js and deployed it in a browser environment. Finally, this chapter introduced model fine-tuning with transfer learning. We converted our data processing code from Python to JavaScript and further trained frozen Keras models in Node.js and Electron environments, before building a GUI application to create Twitter bots from individual user accounts 🙌.
If you're feeling overwhelmed by the amount of code we just went through, or like you don't understand a lot of it, don't worry! This tutorial was written to illustrate what a full machine learning pipeline can look like in practice, from ideation + data gathering to application launch. The code we've been working through took weeks to research, author, and debug. We created three GitHub repositories to store the code we've broken apart and pieced back together for this tutorial series. If you are looking to dig deeper, or check your work, have a look at them.
Return to the main page.
All source code in this document is licensed under the GPL v3 or any later version. All non-source code text is licensed under a CC-BY-SA 4.0 international license. You are free to copy, remix, build upon, and distribute this work in any format for any purpose under those terms. A copy of this website is available on GitHub.